
How To: Seat Belt Retractor Cover
February 9, 2016 DIY, How To, Vehicles 0 comment apomerleau16At the very start of any design or creation is a problem. A problem that obviously needs a solution. With the desire to build a custom truck, fabricating parts to work with the application solves many problems. Having a custom interior will mean that all panels, plastic, and even the dash were removed. Designing and creating new parts brings the interior back to life. Parts needing to be designed and built include the door panels, dashboard, seat, and seat belt retractor covers.
Design processes allowed the project to start. Here, unsightly retracting mechanisms would need to be covered. Card board was used to cut and shape a rough template of the idea. Transferring this template to paper would result in a second draft and smoother design. Having exact measurements now, the paper design could be cut into crafting cardboard, which when taped together a 3 dimensional design of the seat belt covers is created. A 3-D model will be useful in creating the final product with sheet metal and welding processes.
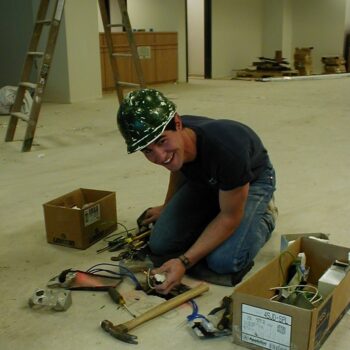
Ensuring that all necessary tools are accessible is an essential step. These tools include a gas welder, electric shears, pencil, metal square, C-clamps, aviation snips, a flat file, sheet metal brake, cutoff wheel, and ball peen hammers. Once all of these items are gathered, construction can begin. Construction will involve cutting, bending, welding, and painting.
Cutting: Finding a sufficiently sized piece of sheet metal will be essential to building this project. Laying the cardboard template flat, the shape can be traced onto the sheet metal for the driver and passenger seat belts. Cutting near the lines with electric shears will remove all excess material. To get the two pieces symmetrical, flat files can smooth each edge perfectly to the lines drawn, while clamping to a straight edge bench as a guide.
Bending: This will be the key in determining which side the piece will go on. On one piece, all the sides will need to be bent in from the face so that they will meet their joining sides. On the second piece, all sides will be bent out from the face to meet their joining sides. Resulting, should be a drivers side and passengers side cover.
Welding: Working with a thin sheet metal will result in lighter pieces. Being a plus in weight savings, it is harder to weld than heavier, thicker metal. Shooting pulses and dots of welds, skipping around along the edges to disperse heat evenly. Over heating the metal will melt it, and warp the faces. Holes along the weld will need to be filled by carefully welding small dots to connect it all. Since the inside will be unseen by anyone else, this is the final stage for internal work. 
Painting: Keeping an unseen inside will be easy, as the covers serve their purpose. The outside, however, will be seen and is uneven and need lots of fixing. Fixing these imperfections will be very time consuming. Many coats of Bondo will leave the outside surfaces and edges smooth and symmetrical to the other side. As I am still in the process of smoothing the surface with Bondo and sanding, I cannot offer a final result. Once the surfaces are both smooth and flush, primer can be sprayed on each. When the primer is dry and lightly sanded, a color will need to be chosen and sprayed over the pieces in many fine coats.
Achieving all the above steps will result with two painted seat belt retractor covers. Covering the mechanism on the drivers and passengers side while allowing for full removal and access.


